数字图像处理基础
前言
- 教材为:数字图像处理__第三版__冈萨雷斯
-
实现环境为:windows10 python3.7 opencv-python PIL Jupyter notebook
这一个系列都是在用具体的代码实例来完成对Digital Image Process的知识巩固,其问题来源为教材中的用例,或者根据某些知识联想到的点,以及课后这本书作者留下的project。
采样与量化
图像是连续的,为了在计算机上进行显示,我们需要对原图像进行采样和量化。在坐标值上对图像进行数字化称为采样,对幅值上数字化称为量化。
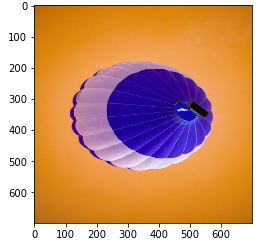
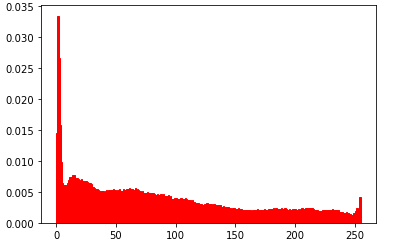
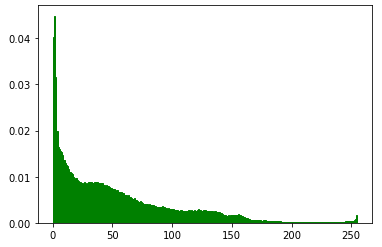
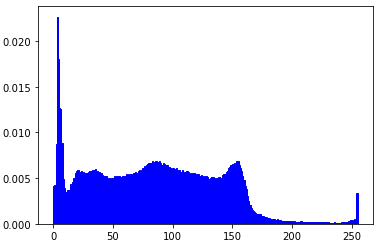
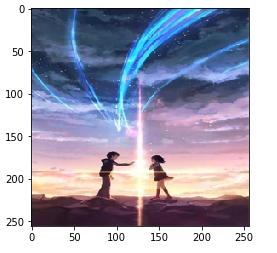
- task2_1:绘制一幅图片的R,G,B分布情况,并分别显示三种单通道下的图片。
代码如下:
from PIL import Image
import numpy as np
import matplotlib.pyplot as plt

# 当前路径需要更改为图片路径
img=Image.open(r"D:\JupyterStore\zdip\t2_01.jpg")

# 分离出原图像中的r,g,b通道
r,g,b=img.split()

im=Image.Image.split(img)

# 绘制分别显示r,g,b图像
im[0].show()
im[1].show()
im[2].show()

# 分别统计rgb出现频次,绘制统计图
plt.figure("R")
# flatten()函数用于将原数组折叠为一维数组
ar=np.array(r).flatten()
plt.hist(ar, bins=256, normed=1,facecolor='r',edgecolor='r')

plt.figure("G")
ag=np.array(g).flatten()
plt.hist(ag, bins=256, normed=1, facecolor='g',edgecolor='g')

plt.figure("B")
ab=np.array(b).flatten()
plt.hist(ab, bins=256, normed=1, facecolor='b',edgecolor='b')
plt.show()
部分效果如下:
空间和灰度分辨率
空间分辨率是图像中可辩别的最小细节的度量,在数量上,每单位距离线对数和每单位距离点数是最通用的度量。
灰度分辨率是指灰度级中可分辨的最小变化。灰度级数为2的整数次幂,通常[0,255]即256为2的8次幂,即为8比特的灰度分辨率。
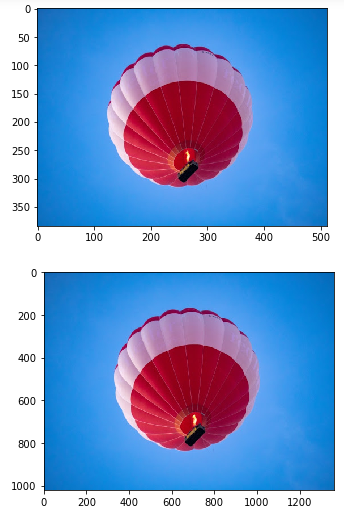
- task2_2:改变图像分辨率,依次从256/32/8,观察图片变化。
代码实现:
from PIL import Image
import matplotlib.pyplot as plt

img=Image.open(r'D:\JupyterStore\zdip\t2_02.jpg')

plt.figure("256-256")
plt.imshow(img.resize((256,256)))
plt.figure("32-32")
plt.imshow(img.resize((32,32)))
plt.figure("8-8")
plt.imshow(img.resize((8,8)))
效果如下:
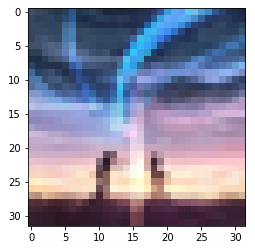
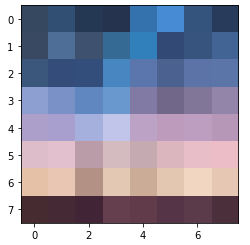
可以观察到,随着分辨率的降低,图片越来越模糊,大部分细节丢失。
图像内插
图像内插是用来调整图像大小的基本图像重取样方法。内插是一种用已知数据来估计未知数据的处理。比如我们上一个task就是要将图像的分辨率逐级缩减,同样地,如果我们要将分辨率扩增也要用到内插方法。
将一幅320*320分辨率的图像扩增成[640,640],我们可以假设该[640,640]的网格存在,对该网格的每一像素点赋予灰度值,需要根据原图像[320,320]寻找最为接近的像素。由寻找匹配像素点方式的不同,内插可以分为邻近内插、双线性内插、双三次内插等。
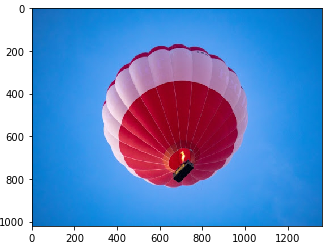
- task2_3:使用不同的内插方法来实现对一幅图像分辨率的扩增,要求原生实现,不得调用resize()函数。
tips:
-
最邻近:根据区域分布值取目标对应左上角、右上角、左下角、右下角像素点即可。
-
双线性:以目标像素点为坐标轴,对应像素为f(x,y)=f(0,0)(1-x)(1-y)+f(1,0)x(1-y)+f(0,1)(1-x)y+f(1,1)xy。转化为f(i+u, j+v) = (1-u) * (1-v) * f(i, j) + (1-u) * v * f(i, j+1) + u * (1-v) * f(i+1, j) + u * v * f(i+1, j+1)。
-
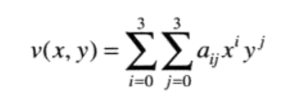
双三次:不给予实现,处理较为复杂。以下是赋予点灰度值匹配公式。
代码实现:
#coding=utf-8
import cv2
import numpy as np
import matplotlib.pyplot as plt

def Nearest_test(img,height,width):
    newImg = np.zeros(shape=(height,width,img.shape[2]),dtype = np.uint8)

    newImg[0][0] = img[0][0]
    for i in range(1,height):
        for j in range(1,width):
            r = round(img.shape[0] / height * i)
            c = round(img.shape[1] / width * j)
            if r == img.shape[0] or c == img.shape[1]:
                r -= 1
                c -= 1

            newImg[i][j] = img[r][c]

    return newImg


def Bilinear_test(img,height,width):
    newImg = np.zeros(shape=(height,width,img.shape[2]),dtype = np.uint8)

    newImg[0][0] = img[0][0]
    for i in range(1,height):
        for j in range(1,width):
            r = img.shape[0] / height * i
            c = img.shape[1] / width * j
            u = r - int(r)
            v = c - int(c)
            r = int(r)
            c = int(c)
            if r == img.shape[0]-1 or c == img.shape[1]-1:
                r -= 1
                c -= 1

            newImg[i][j] = (1-u)*(1-v)*img[r][c] + (1-u)*v*img[r][c] + u*(1-v)*img[r][c] + u*v*img[r][c]

    return newImg

if __name__ == '__main__':
    img = cv2.imread(r'D:\JupyterStore\zdip\t2_03.jpg')
    #转换BGR为RGB
    img = img[:,:,::-1]

    nearest_img = Nearest_test(img,1020,1360)
    Bilinear_img = Bilinear_test(img,1020,1360)
    plt.figure("原图像")
    plt.imshow(img)

    plt.figure("邻近插值")
    plt.imshow(nearest_img)

    plt.figure("双线性插值")
    plt.imshow(Bilinear_img)

    #可以把图片保存下来放大后对比效果更明显
    plt.show()
实现效果:这样看不是特别明显0.0
图像基本操作
图像算数操作是一种阵列操作,即图像对应像素的操作。其应用包括针对降噪的带噪图像相加平均,增强差别的图像相减,图像相乘来矫正阴影。
图像集合操作包括并集,异或等。
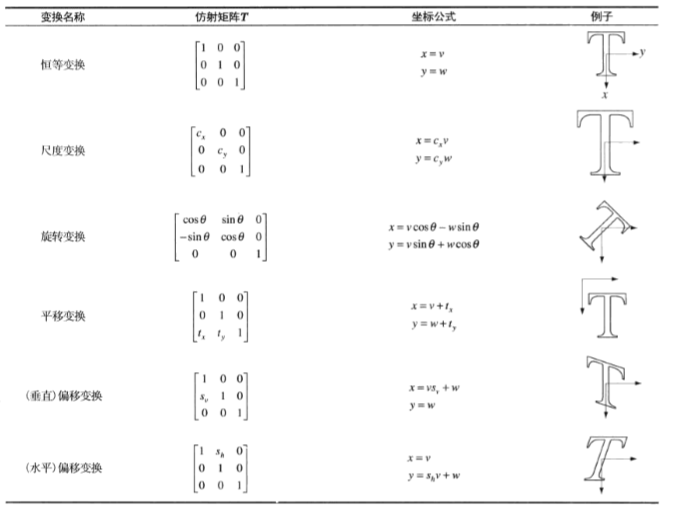
图像空间操作包括图像的几何变换,例如翻转,下图为各种仿射变换样例。其中映射方式有前向映射和反向映射两种。
- task2_4:原生实现部分图像基本操作。
tips:
- 由于教材附带的样图不全,因此部分例子无法复现,故精简实现过程。
- 所用图片为task2_1和task2_3的原图。
代码实现:
import cv2
import numpy as np
import matplotlib.pyplot as plt
import math

def rotate_test(imga,angel):
    height = imga.shape[0]
    width = imga.shape[1]
    newImg = np.zeros(shape=(height,width,imga.shape[2]),dtype=np.uint8)

    for i in range(0,height):
        for j in range(0,width):
            u = math.cos(angel)* i - math.sin(angel)*j
            v = math.sin(angel)* i - math.cos(angel)*j
            u = round(u)
            v = round(v)

            #注意这里的两种写法分别是逆时针,顺时针旋转
            #newImg[u][v] = imga[i][j]
            newImg[i][j] = imga[u][v]

    return newImg

def arithmetic_test(img_a,img_b,method):
    methodList = ['add','sub','mutil','div','insect','union']
    height = img_a.shape[0]
    width = img_a.shape[1]
    newImg = np.zeros(shape=(height,width,img_a.shape[2]),dtype=np.uint8)

    if (method==methodList[0]):
        newImg = (img_a + img_b)/2
        # 注意这里的numpy数据类型已经发生改变,需要强转回int
        newImg = newImg.astype(int)
    elif (method==methodList[1]):
        newImg = abs(img_a - img_b)
    elif (method==methodList[2]):
        newImg = (img_a * img_b)/256
        newImg = newImg.astype(int)


    elif (method==methodList[3]):
        # 消除img_b中元素为0的干扰
        addImg = np.ones(shape=(height,width,img_a.shape[2]),dtype=np.uint8)
        img_b = cv2.add(img_b,addImg)
        newImg = img_a / img_b
        newImg = newImg.astype(int)

    elif (method==methodList[4]):
        newImg = np.minimum(img_a,img_b)

    elif (method==methodList[5]):
        newImg = np.maximum(img_a,img_b)

    else:
        print ("unvalid method name input!")


    return newImg

def initData():
    img_a = cv2.imread(r'D:\JupyterStore\zdip\t2_01.jpg')
    img_a = cv2.resize(img_a,(860,600),interpolation=cv2.INTER_CUBIC)
    img_a = img_a[:,:,::-1]

    img_b = cv2.imread(r"D:\JupyterStore\zdip\t2_03.jpg")
    imga = cv2.resize(img_b,(700,700),interpolation=cv2.INTER_CUBIC)
    img_b = cv2.resize(img_b,(860,600),interpolation=cv2.INTER_CUBIC)
    img_b = img_b[:,:,::-1]

    img_additiontest = arithmetic_test(img_a,img_b,'add')
    img_subtraction = arithmetic_test(img_a,img_b,'sub')
    img_mutilplication = arithmetic_test(img_a,img_b,'mutil')
    img_division = arithmetic_test(img_a,img_b,'div')
    img_intersection = arithmetic_test(img_a,img_b,'insect')
    img_union = arithmetic_test(img_a,img_b,'union')

    #注意输入参数为弧度
    img_rotate = rotate_test(imga,math.pi/2)

    plt.figure("相加图像")
    plt.imshow(img_additiontest)

    plt.figure("相减图像")
    plt.imshow(img_subtraction)

    plt.figure("相乘图像")
    plt.imshow(img_mutilplication)

    plt.figure("相除图像")
    plt.imshow(img_division)

    plt.figure("相交图像")
    plt.imshow(img_intersection)

    plt.figure("相并图像")
    plt.imshow(img_union)

    plt.figure("旋转图像")
    plt.imshow(img_rotate)

    plt.show()


if __name__ == '__main__':
   initData()
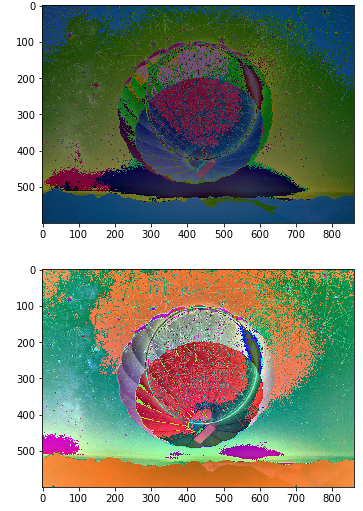
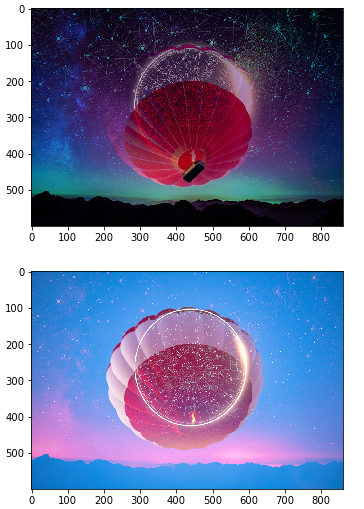
实现效果:相加、相减、相乘、相除、交集操作、并集操作

实现效果:顺时针旋转、逆时针旋转